

jjtguitar
Well-Known Member
Just got myself a second hand PBC10 after years of dreaming and planning. Couldn't wait/afford the parts for the cables I'll build to set it up properly, but also couldn't wait to try out my new toy...
I'm curious, has anyone else with a PBC10 created a Frankenstein rig out of whatever cables they can lay their hands on just to start making glorious noise as soon as possible?

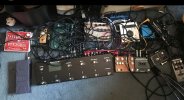
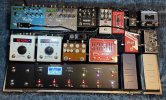
Pedals in loops of the PBC10 are inside the yellow box (NOT including the Keeley Super Phat Mod, Tuner or volume pedal. The main area of chaos is the "pile of drives". Here is another angle...

Signal flow is as follows:
Guitar into PBC10
Loop 1: POG2
Loop 2: Xotic SP Compressor
Loop 3: Decibelics Golden Horse
Loop 4: Analogman Prince of Tone
Loop 5: Lovepedal Eternity Kanji
Loop 6: Mesa Throttle Box
Out 5-6: to Kingsley Squire Preamp
In 7-10: from Kingsley Squire Preamp
Loop 7: Strymon DIG (stereo, parallel)
Loop 8: Strymon BigSky (stereo, parallel)
Loop 9: Strymon Timeline (stereo, parallel)
Loop 10: Neunaber Illumine (stereo, parallel)
Out L/R: to GFI Cabzeus
PBC is sending MIDI to Selah Quartz timer, Timeline, BigSky and Illumine
Selah Quartz is sending tempo info to the Timeline and DIG.
I'm currently testing this in my studio straight into my DAW (Reason or Ableton Live) using studio monitors or IEM. It may be a mess, but it sounds awesome.
Currently doing A/B tests between the Squire/Cabzeus pairing and a DSM Humboldt Simplifier (which can be seen in the top of the first pic) to try and work out which I like better.
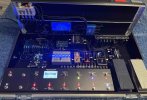
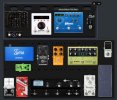
It is currently setup on a Pedaltrain Pro board, but that is only a temporary solution as it won't be large enough for what I'm planning in the long run. My initial plan for the PT-Pro is below (mocked up in SketchUp).

This plan quickly unraveled for the following reasons:
1. I didn't have plugs and cables to build everything "properly", only a varied assortment of patch leads The length of these patch leads led to the "Pile of Drives" and also the rearrangement of the Illumine and Timeline.
2. The Supro Trem was in loop 7 but I didn't have the correct cables to put a mono input/output pedal into a stereo loop, and it did NOT cope with the high output of the Squire preamp.
3. After hearing how awesome the Illumine and Timeline were in parallel, I decided I simply must find out how good a BigSky and DIG sound in parallel. At the same time as the Timeline and Illumine. So the trem and dimension had to make way. And it sounds GLORIOUS.
4. I swapped out the Octopus analog octave for the POG2, and was reminded how good it sounded.
I do have to give a big plus to the Neunaber Illumine, as it has TRS input and output! So I could use some TRS patch leads I had lying around for that pedal, didn't need an insert cable. Very impressed, hope it gets added to the device list soon!
So where to from here? I've ordered a dual external footswitch for page up/down duties, which will go between the PBC and the Quartz. I'm also getting six patch leads so I'll be able to hopefully get the pile of drives into some semblance of order. Or at least three pedals. I'm hoping I can get it at least a little neater so I feel I can take it out in public without people recoiling in horror.
I'm planning to swap the DIG for a Free the Tone Future Factory. If the DIG had MIDI and presets, it would stay, but alas it does not. I'm also planning on modding the POG2 for MIDI. I will probably consider a GFI Synesthesia to handle modulation duties in Loop 6 and bump the Golden Horse to always on buffer (which I have been using it for). And maybe a MIDI controlled drive...
I'm curious, has anyone else with a PBC10 created a Frankenstein rig out of whatever cables they can lay their hands on just to start making glorious noise as soon as possible?
Pedals in loops of the PBC10 are inside the yellow box (NOT including the Keeley Super Phat Mod, Tuner or volume pedal. The main area of chaos is the "pile of drives". Here is another angle...
Signal flow is as follows:
Guitar into PBC10
Loop 1: POG2
Loop 2: Xotic SP Compressor
Loop 3: Decibelics Golden Horse
Loop 4: Analogman Prince of Tone
Loop 5: Lovepedal Eternity Kanji
Loop 6: Mesa Throttle Box
Out 5-6: to Kingsley Squire Preamp
In 7-10: from Kingsley Squire Preamp
Loop 7: Strymon DIG (stereo, parallel)
Loop 8: Strymon BigSky (stereo, parallel)
Loop 9: Strymon Timeline (stereo, parallel)
Loop 10: Neunaber Illumine (stereo, parallel)
Out L/R: to GFI Cabzeus
PBC is sending MIDI to Selah Quartz timer, Timeline, BigSky and Illumine
Selah Quartz is sending tempo info to the Timeline and DIG.
I'm currently testing this in my studio straight into my DAW (Reason or Ableton Live) using studio monitors or IEM. It may be a mess, but it sounds awesome.
Currently doing A/B tests between the Squire/Cabzeus pairing and a DSM Humboldt Simplifier (which can be seen in the top of the first pic) to try and work out which I like better.
It is currently setup on a Pedaltrain Pro board, but that is only a temporary solution as it won't be large enough for what I'm planning in the long run. My initial plan for the PT-Pro is below (mocked up in SketchUp).
This plan quickly unraveled for the following reasons:
1. I didn't have plugs and cables to build everything "properly", only a varied assortment of patch leads The length of these patch leads led to the "Pile of Drives" and also the rearrangement of the Illumine and Timeline.
2. The Supro Trem was in loop 7 but I didn't have the correct cables to put a mono input/output pedal into a stereo loop, and it did NOT cope with the high output of the Squire preamp.
3. After hearing how awesome the Illumine and Timeline were in parallel, I decided I simply must find out how good a BigSky and DIG sound in parallel. At the same time as the Timeline and Illumine. So the trem and dimension had to make way. And it sounds GLORIOUS.
4. I swapped out the Octopus analog octave for the POG2, and was reminded how good it sounded.
I do have to give a big plus to the Neunaber Illumine, as it has TRS input and output! So I could use some TRS patch leads I had lying around for that pedal, didn't need an insert cable. Very impressed, hope it gets added to the device list soon!
So where to from here? I've ordered a dual external footswitch for page up/down duties, which will go between the PBC and the Quartz. I'm also getting six patch leads so I'll be able to hopefully get the pile of drives into some semblance of order. Or at least three pedals. I'm hoping I can get it at least a little neater so I feel I can take it out in public without people recoiling in horror.
I'm planning to swap the DIG for a Free the Tone Future Factory. If the DIG had MIDI and presets, it would stay, but alas it does not. I'm also planning on modding the POG2 for MIDI. I will probably consider a GFI Synesthesia to handle modulation duties in Loop 6 and bump the Golden Horse to always on buffer (which I have been using it for). And maybe a MIDI controlled drive...


") I also have the PBC10 and among other things the Freqout. It is just a shame that you alway have to activate it manually and after years of using it I am still struggling what might be the best setting. I think the third harmonic setting is used by a lot of people, but at the end of the day I prefer the first harmonic setting. I have struggled with a lot of feedback emulations. I have never found something which just sounds right. Recently I got myself an Ebow. I always thought an Ebow is just a gimmick, but this produces to my ears by far the nicest feedback sound I have ever heard. It just immediately sounds right. Even in the standard settings which is theoretically without harmonics the harmonics come when you put some distortion after it. So that's my favorite setting. So my dream feedback emulation would be a pedal which produces exactly this beautiful sound. The icing on the cake would be the possibility to recall presets via MIDI and Expression Pedal input. I don't know the Ebow has immediately this magic sound quality, maybe I am still using the Freqout in a wrong way, although I have to admit that the ability to also have the Feedback Effect on chords is a great thing. Think for example of Zoot Allures by Frank Zappa. You can recreate that with the Freqout in the third harmonic setting and it doesn't sound bad at all, but as I said generally the Ebow sounds so much nicer, but it takes time to change between the pick and the Ebow so a Pedal is way more practical.
I also have the PBC10 and among other things the Freqout. It is just a shame that you alway have to activate it manually and after years of using it I am still struggling what might be the best setting. I think the third harmonic setting is used by a lot of people, but at the end of the day I prefer the first harmonic setting. I have struggled with a lot of feedback emulations. I have never found something which just sounds right. Recently I got myself an Ebow. I always thought an Ebow is just a gimmick, but this produces to my ears by far the nicest feedback sound I have ever heard. It just immediately sounds right. Even in the standard settings which is theoretically without harmonics the harmonics come when you put some distortion after it. So that's my favorite setting. So my dream feedback emulation would be a pedal which produces exactly this beautiful sound. The icing on the cake would be the possibility to recall presets via MIDI and Expression Pedal input. I don't know the Ebow has immediately this magic sound quality, maybe I am still using the Freqout in a wrong way, although I have to admit that the ability to also have the Feedback Effect on chords is a great thing. Think for example of Zoot Allures by Frank Zappa. You can recreate that with the Freqout in the third harmonic setting and it doesn't sound bad at all, but as I said generally the Ebow sounds so much nicer, but it takes time to change between the pick and the Ebow so a Pedal is way more practical.

.jpg")